Day 1: Setting Up Your Distributed Systems Environment
Welcome to the first day of our “254-Day Distributed Log Processing System Implementation” journey! Today, we’ll set up the foundation for building your distributed system by configuring your development environment.
What Are Distributed Systems?
Imagine you and your friends are organizing a massive school event. If one person tried to handle everything—decorations, food, music, tickets—they’d be overwhelmed. Instead, you divide tasks among team members who coordinate through group chats. That’s essentially a distributed system: multiple computers working together as one cohesive unit, sharing information to solve problems too large for a single machine.
Why Docker, Git, and VS Code?
Before building a skyscraper, you need proper tools and a solid foundation. For our distributed system:
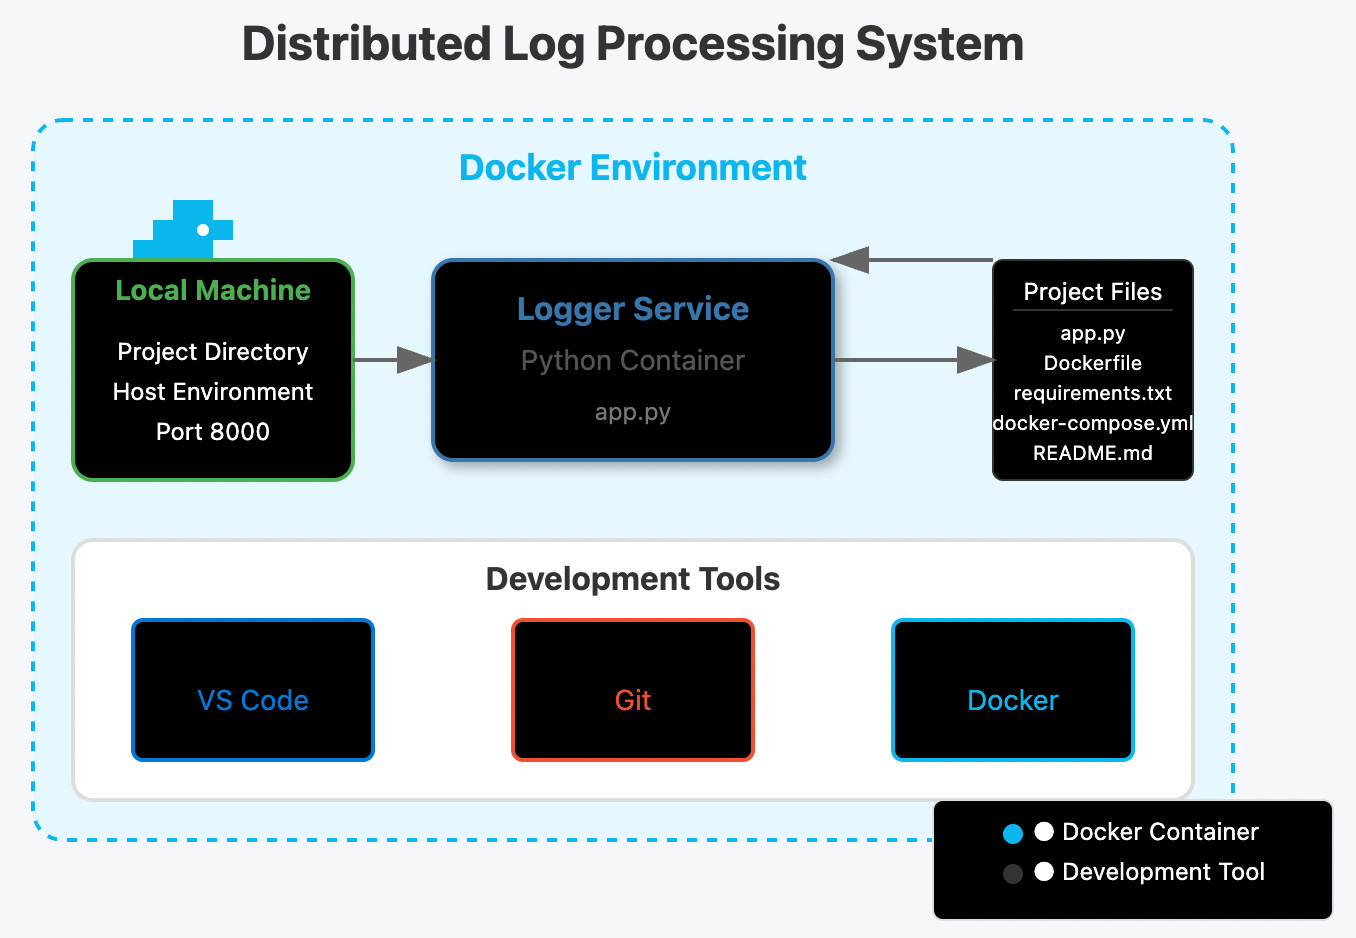
- Docker creates consistent environments across different computers (like having identical science lab kits for everyone)
- Git tracks changes and enables collaboration (like keeping organized notes that everyone can share)
- VS Code provides a powerful editor with extensions for our work (like having a customizable workbench)
Architecture Diagram

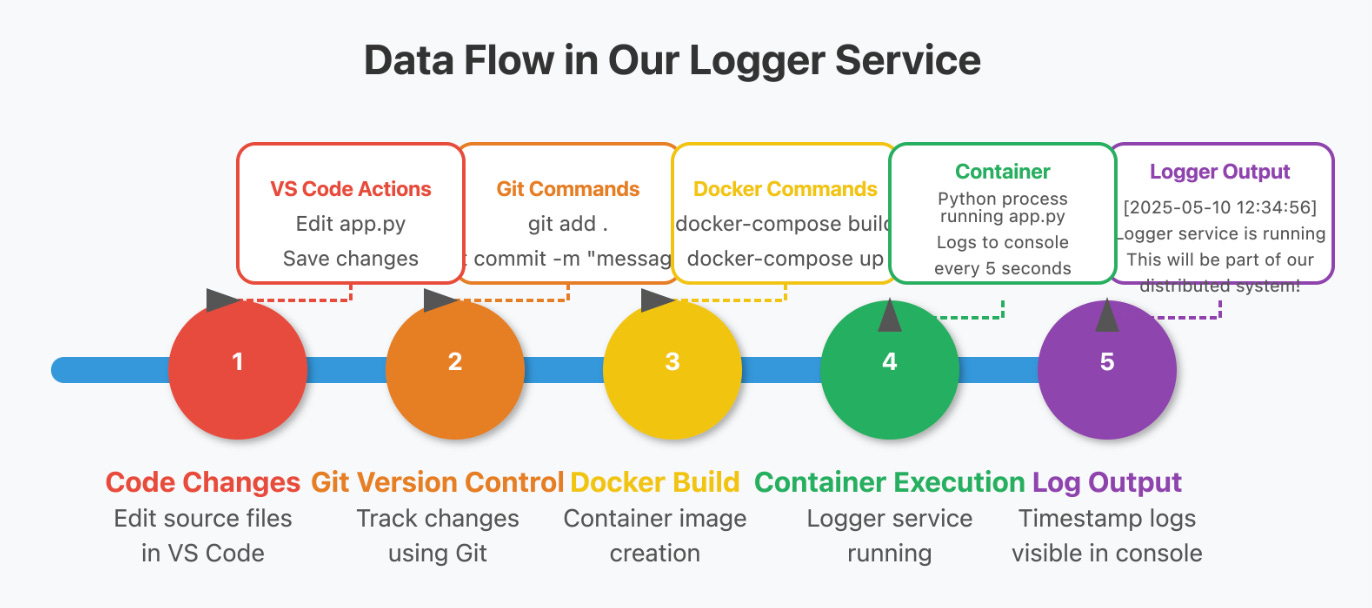
Data Flow Diagram

This project is part of the “365-Day Distributed Log Processing System Implementation” series.
We’re building a distributed system for processing log data at scale. This repository contains all the code and configuration needed to run the system.
The logger service can be configured using environment variables in the docker-compose.yml file:
| Environment Variable | Description | Default Value |
|---|---|---|
| LOG_LEVEL | Minimum log level to output (DEBUG, INFO, WARNING, ERROR, CRITICAL) | INFO |
| LOG_FREQUENCY | How often to generate heartbeat logs (seconds) | 5.0 |
| LOG_TO_FILE | Whether to write logs to a file | true |
| LOG_FILE_PATH | Path where log files will be stored | /logs/logger.log |
| LOG_MAX_SIZE_MB | Maximum log file size before rotation (MB) | 1.0 |
| WEB_HOST | Host address for the web interface | 0.0.0.0 |
| WEB_PORT | Port for the web interface | 8080 |
| MAX_LOGS_TO_DISPLAY | Maximum number of logs to store in memory for the web interface | 100 |
The logger service includes a web interface for viewing logs and configuration:
- URL: http://localhost:8080
- Features:
- View recent log messages
- See current configuration
- Auto-refresh logs every 10 seconds
- Filter logs by level using CSS color-coding
Logs are stored in the ./logs directory on your host machine, which is mounted as a volume in the Docker container. Log files are automatically rotated when they reach the configured maximum size.
Overview
Goals:
- Set up a development environment with Docker, Git, Gradle, and IntelliJ IDEA.
- Create a Spring Boot-based logger service using Gradle as the build tool.
- Containerize the service with Docker and run it to print timestamped logs.
- Complete the Day 1 Assignment by adding configuration, file logging, a web interface, and updated documentation.
- Use IntelliJ IDEA for development, leveraging its Spring Boot and Gradle integrations.
Tools:
- Spring Boot: For building a lightweight Java microservice.
- Gradle: For dependency management and building the project.
- Logback: For console and file logging with rotation.
- Docker: To containerize the service.
- Git: For version control.
- IntelliJ IDEA: As the IDE with Spring Boot, Gradle, and Docker plugins.
Note: This assumes you’re starting fresh or adapting the previous Java project. If you’re continuing from the Maven-based project, I’ll highlight how to convert it to Gradle.
Step 1: Setting Up Your Environment
1. Install Git
- Windows: Download from git-scm.com and install with default options.
- Mac: Run
xcode-select --installin Terminal. - Linux: Run
sudo apt-get update && sudo apt-get install git(Ubuntu/Debian). - Verify:
git --version
2. Install Docker
- Windows/Mac: Download Docker Desktop and follow the setup wizard.
- Linux: Follow the official Docker guide.
- Verify:
docker --versionanddocker-compose --version
3. Install IntelliJ IDEA
- Download IntelliJ IDEA Ultimate (preferred for Spring Boot support) or Community Edition from jetbrains.com/idea.
- Install with default settings.
- Enable plugins (go to File > Settings > Plugins):
- Spring Boot (pre-installed in Ultimate, install for Community).
- Gradle (pre-installed, ensure it’s enabled).
- Docker (install and enable).
- Git (pre-installed, ensure it’s enabled).
- YAML (pre-installed, ensure it’s enabled).
4. Install Java
- Install Java 17 (LTS, compatible with Spring Boot 3.x).
- Windows/Mac: Download from Adoptium or use SDKMAN (
sdk install java 17.0.8-tem). - Linux: Run
sudo apt install openjdk-17-jdk(Ubuntu/Debian).
- Windows/Mac: Download from Adoptium or use SDKMAN (
- Verify:
java --version - In IntelliJ IDEA, ensure the project SDK is set to Java 17 (File > Project Structure > SDKs).
5. Install Gradle
- Gradle is typically managed per project, but you can install it globally for convenience.
- Windows/Mac: Download from gradle.org or use SDKMAN (
sdk install gradle). - Linux: Run
sudo apt install gradle(Ubuntu/Debian) or use SDKMAN.
- Windows/Mac: Download from gradle.org or use SDKMAN (
- Verify:
gradle --version - IntelliJ IDEA includes a Gradle wrapper (
gradlew), so global installation is optional.
Step 2: Creating Your Project Repository
- Open a terminal and create the project directory:
mkdir distributed-log-processor cd distributed-log-processor - Initialize a Git repository:
git init - Create the project structure:
mkdir -p src/services/logger config data docs tests touch README.md docker-compose.yml .gitignore - Create a
.gitignorefile:echo "# Java" > .gitignore echo "build/" >> .gitignore echo "*.class" >> .gitignore echo "*.jar" >> .gitignore echo "*.war" >> .gitignore echo ".env" >> .gitignore echo "data/" >> .gitignore echo ".idea/" >> .gitignore echo "*.iml" >> .gitignore echo ".gradle/" >> .gitignore
Step 3: Building the Logger Service with Spring Boot and Gradle
We’ll create a Spring Boot logger service that prints timestamped messages every 5 seconds, similar to the Python and Maven versions, but using Gradle as the build tool and IntelliJ IDEA for development.
1. Create the Spring Boot Project with Gradle
Use IntelliJ IDEA to generate a Spring Boot project with Gradle, or set it up manually.
Using IntelliJ IDEA:
- Open IntelliJ IDEA and select File > New > Project.
- Choose Spring Initializr:
- Project: Gradle (Kotlin DSL or Groovy DSL, we’ll use Groovy for simplicity).
- Language: Java.
- Spring Boot: Latest stable (e.g., 3.3.4).
- Group:
com.distributedlog. - Artifact:
logger-service. - Java: 17.
- Packaging: Jar.
- Add dependencies:
- Spring Web (for REST API and web interface).
- Spring Boot Actuator (for monitoring).
- Lombok (optional, for reducing boilerplate code).
- Set the project location to
distributed-log-processor/src/services/logger. - Click Create.
This generates a Gradle-based Spring Boot project with a build.gradle file and basic structure.
Manual Setup (if not using IntelliJ IDEA’s Initializr):
- Create the directory:
mkdir -p src/services/logger cd src/services/logger - Create
build.gradle:plugins { id 'org.springframework.boot' version '3.3.4' id 'io.spring.dependency-management' version '1.1.6' id 'java' } group = 'com.distributedlog' version = '0.0.1-SNAPSHOT' java { sourceCompatibility = '17' } repositories { mavenCentral() } dependencies { implementation 'org.springframework.boot:spring-boot-starter-web' implementation 'org.springframework.boot:spring-boot-starter-actuator' implementation 'ch.qos.logback:logback-classic' implementation 'org.projectlombok:lombok' annotationProcessor 'org.projectlombok:lombok' } tasks.named('test') { useJUnitPlatform() } - Create
settings.gradle:rootProject.name = 'logger-service' - Create the source structure:
mkdir -p src/main/java/com/distributedlog/logger
mkdir -p src/main/resources
2. Implement the Logger Service
Create the main application class and configure logging.
- Create
src/main/java/com/distributedlog/logger/LoggerApplication.java:package com.distributedlog.logger; import lombok.extern.slf4j.Slf4j; import org.springframework.boot.SpringApplication; import org.springframework.boot.autoconfigure.SpringBootApplication; import org.springframework.scheduling.annotation.EnableScheduling; import org.springframework.scheduling.annotation.Scheduled; @SpringBootApplication @EnableScheduling @Slf4j public class LoggerApplication { public static void main(String[] args) { SpringApplication.run(LoggerApplication.class, args); log.info("Starting distributed logger service..."); } @Scheduled(fixedRate = 5000) public void logMessage() { log.info("Logger service is running. This will be part of our distributed system!"); } }- Uses
@Slf4jfrom Lombok for logging with SLF4J and Logback. @EnableSchedulingenables scheduled tasks.- The
@Scheduledmethod logs every 5 seconds.
- Uses
- Create a Logback configuration (
src/main/resources/logback-spring.xml):<?xml version="1.0" encoding="UTF-8"?> <configuration> <appender name="CONSOLE" class="ch.qos.logback.core.ConsoleAppender"> <encoder> <pattern>%d{yyyy-MM-dd HH:mm:ss} [%level] %msg%n</pattern> </encoder> </appender> <root level="${LOG_LEVEL:-INFO}"> <appender-ref ref="CONSOLE"/> </root> </configuration> - Create
src/main/resources/application.yml:server: port: 8000 logging: level: com.distributedlog: ${LOG_LEVEL:INFO}
3. Create the Dockerfile
In src/services/logger/Dockerfile:
FROM eclipse-temurin:17-jdk-alpine

WORKDIR /app

COPY build.gradle settings.gradle ./
COPY gradlew .
COPY gradle ./gradle
COPY src ./src

RUN ./gradlew build -x test

EXPOSE 8000

CMD ["java", "-jar", "build/libs/logger-service-0.0.1-SNAPSHOT.jar"]
4. Create docker-compose.yml
In the project root:
version: '3'
services:
  logger:
    build:
      context: ./src/services/logger
    volumes:
      - ./src/services/logger:/app
    ports:
      - "8000:8000"
    environment:
      - LOG_LEVEL=INFO
5. Update README.md
# Distributed Log Processing System

This project is part of the "254-Day Distributed Log Processing System Implementation" series.

## Project Overview
We're building a distributed system for processing log data at scale using Java, Spring Boot, and Gradle.

## Getting Started

### Prerequisites
- Docker and Docker Compose
- Git
- IntelliJ IDEA (recommended)
- Java 17
- Gradle

### Running the Application
1. Clone this repository
2. Open in IntelliJ IDEA
3. Run `docker-compose up --build`

## Project Structure
- `src/services/`: Contains individual microservices
- `config/`: Configuration files
- `data/`: Data storage (gitignored)
- `docs/`: Documentation
- `tests/`: Test suites

## Day 1 Milestones
- Set up development environment
- Created project structure
- Implemented basic logger service
Step 4: Build and Test the Logger Service in IntelliJ IDEA
- Open the Project in IntelliJ IDEA:
- Select File > Open and choose the
distributed-log-processordirectory. - IntelliJ IDEA will detect the Gradle project and import it automatically.
- If prompted, enable Auto-Import for Gradle dependencies.
- Select File > Open and choose the
- Build the Project:
- Open the Gradle tool window (right sidebar, or View > Tool Windows > Gradle).
- Run the
buildtask: Tasks > build > build. - Alternatively, use the terminal:
cd src/services/logger
./gradlew build
- Run the Docker Container:
- In the terminal, navigate to the project root:
cd distributed-log-processor docker-compose up --build - Or use IntelliJ IDEA’s Docker integration:
- Open
docker-compose.yml, right-click, and select Run. - IntelliJ IDEA will build and start the container.
- Open
- In the terminal, navigate to the project root:
- Verify the Output:
- Check the Docker logs in IntelliJ IDEA’s Services tab or the terminal.
- Expected output:
2025-07-07 16:28:00 [INFO] Starting distributed logger service... 2025-07-07 16:28:05 [INFO] Logger service is running. This will be part of our distributed system! - Logs appear every 5 seconds on port 8000.
Step 5: Day 1 Assignment – Extending the Logger Service
Complete the assignment by adding configuration, file logging, a web interface, and documentation, using Spring Boot, Gradle, and IntelliJ IDEA.
Task 1: Create a Configuration File
Create a configuration class to manage log levels, frequency, and format.
- Create
src/main/java/com/distributedlog/logger/config/LoggerConfig.java:package com.distributedlog.logger.config; import lombok.Data; import org.springframework.boot.context.properties.ConfigurationProperties; import org.springframework.context.annotation.Configuration; @Configuration @ConfigurationProperties(prefix = "logger") @Data public class LoggerConfig { private String logLevel = "INFO"; private long frequency = 5000; private String format = "standard"; } - Update
application.yml:server: port: 8000 logging: level: com.distributedlog: ${LOG_LEVEL:INFO} logger: log-level: ${LOG_LEVEL:INFO} frequency: ${LOG_FREQUENCY:5000} format: ${LOG_FORMAT:standard} - Update
LoggerApplication.javato use the configuration:package com.distributedlog.logger; import com.distributedlog.logger.config.LoggerConfig; import lombok.extern.slf4j.Slf4j; import org.springframework.beans.factory.annotation.Autowired; import org.springframework.boot.SpringApplication; import org.springframework.boot.autoconfigure.SpringBootApplication; import org.springframework.scheduling.annotation.EnableScheduling; import org.springframework.scheduling.annotation.Scheduled; @SpringBootApplication @EnableScheduling @Slf4j public class LoggerApplication { @Autowired private LoggerConfig config; public static void main(String[] args) { SpringApplication.run(LoggerApplication.class, args); log.info("Starting distributed logger service..."); } @Scheduled(fixedRateString = "${logger.frequency:5000}") public void logMessage() { String message = "standard".equals(config.getFormat()) ? "Logger service is running. This will be part of our distributed system!" : String.format("Logger service running [Level: %s, Format: %s]", config.getLogLevel(), config.getFormat()); log.info(message); } }
Task 2: Implement Log File Output
Update Logback to log to a file with rotation and persist logs using Docker volumes.
- Update
logback-spring.xml:<?xml version="1.0" encoding="UTF-8"?> <configuration> <appender name="CONSOLE" class="ch.qos.logback.core.ConsoleAppender"> <encoder> <pattern>%d{yyyy-MM-dd HH:mm:ss} [%level] %msg%n</pattern> </encoder> </appender> <appender name="FILE" class="ch.qos.logback.core.rolling.RollingFileAppender"> <file>/logs/app.log</file> <rollingPolicy class="ch.qos.logback.core.rolling.SizeAndTimeBasedRollingPolicy"> <fileNamePattern>/logs/app.%d{yyyy-MM-dd}.%i.log</fileNamePattern> <maxFileSize>1MB</maxFileSize> <maxHistory>30</maxHistory> <totalSizeCap>100MB</totalSizeCap> </rollingPolicy> <encoder> <pattern>%d{yyyy-MM-dd HH:mm:ss} [%level] %msg%n</pattern> </encoder> </appender> <root level="${LOG_LEVEL:-INFO}"> <appender-ref ref="CONSOLE"/> <appender-ref ref="FILE"/> </root> </configuration> - Update
docker-compose.ymlto persist logs:version: '3' services: logger: build: context: ./src/services/logger volumes: - ./src/services/logger:/app - ./data/logs:/logs ports: - "8000:8000" - "8080:8080" environment: - LOG_LEVEL=INFO - LOG_FREQUENCY=5000 - LOG_FORMAT=standard
Task 3: Add a Simple Web Interface
Create a REST controller to display logs and configuration.
- Create
src/main/java/com/distributedlog/logger/web/LogController.java:package com.distributedlog.logger.web; import com.distributedlog.logger.config.LoggerConfig; import lombok.RequiredArgsConstructor; import org.springframework.web.bind.annotation.GetMapping; import org.springframework.web.bind.annotation.RequestMapping; import org.springframework.web.bind.annotation.RestController; import java.io.IOException; import java.nio.file.Files; import java.nio.file.Path; @RestController @RequestMapping("/logs") @RequiredArgsConstructor public class LogController { private final LoggerConfig config; @GetMapping public String getLogs() throws IOException { return String.join("<br>", Files.readAllLines(Path.of("/logs/app.log"))); } @GetMapping("/config") public LoggerConfig getConfig() { return config; } } - Update
application.ymlto run the web interface on port 8080:server: port: 8080 logging: level: com.distributedlog: ${LOG_LEVEL:INFO} logger: log-level: ${LOG_LEVEL:INFO} frequency: ${LOG_FREQUENCY:5000} format: ${LOG_FORMAT:standard}
Task 4: Document Your Changes
Update README.md:
# Distributed Log Processing System

This project is part of the "254-Day Distributed Log Processing System Implementation" series.

## Project Overview
We're building a distributed system for processing log data at scale using Java, Spring Boot, and Gradle.

## Getting Started

### Prerequisites
- Docker and Docker Compose
- Git
- IntelliJ IDEA (recommended)
- Java 17
- Gradle

### Running the Application
1. Clone this repository
2. Open in IntelliJ IDEA
3. Run `docker-compose up --build`
4. Access the web interface at `http://localhost:8080/logs` and configuration at `http://localhost:8080/logs/config`

## Project Structure
- `src/services/`: Contains individual microservices
- `config/`: Configuration files
- `data/`: Data storage (gitignored)
- `docs/`: Documentation
- `tests/`: Test suites

## Day 1 Milestones
- Set up development environment with IntelliJ IDEA, Gradle, and Docker
- Created project structure
- Implemented basic logger service
- Added configuration, file logging, and web interface

## Configuration Options
- `LOG_LEVEL`: Set log level (DEBUG, INFO, WARNING, ERROR, CRITICAL)
- `LOG_FREQUENCY`: Set logging interval in milliseconds (default: 5000)
- `LOG_FORMAT`: Set log format (standard or detailed)
Step 6: Test the Enhanced Service in IntelliJ IDEA
- Rebuild the Project:
- In IntelliJ IDEA, open the Gradle tool window.
- Run Tasks > build > build.
- Or use the terminal:
cd src/services/logger
./gradlew build
- Run Docker Compose:
- Open
docker-compose.ymlin IntelliJ IDEA. - Right-click and select Run.
- Alternatively, use the terminal:
cd distributed-log-processor
docker-compose up --build
- Open
- Verify:
- Check logs in IntelliJ IDEA’s Services tab or terminal:
2025-07-07 16:28:00 [INFO] Starting distributed logger service... 2025-07-07 16:28:05 [INFO] Logger service is running. This will be part of our distributed system! - Verify file logs in
data/logs/app.log. - Access
http://localhost:8080/logsto see logs in the browser. - Access
http://localhost:8080/logs/configto view configuration. - Confirm log rotation (create large logs to test the 1MB limit).
- Check logs in IntelliJ IDEA’s Services tab or terminal:
- Commit Changes to Git:
- In IntelliJ IDEA, open the Commit tab (View > Tool Windows > Commit).
- Select all changes, enter the message:
Day 1: Implemented Java logger service with Spring Boot, Gradle, configuration, file logging, and web interface. - Click Commit and Push to a remote repository (e.g., GitHub).
Step 7: Optional Extension Challenge
To implement a second service that generates random log events:
- Create a new Spring Boot project in
src/services/event-generatorusing IntelliJ IDEA’s New Module wizard (Gradle, Spring Boot). - Add a REST endpoint to generate random logs and send them to
http://localhost:8080/logs/receive(add a new endpoint inLogController). - Update
docker-compose.ymlto include the new service:services: logger: # ... existing configuration ... event-generator: build: context: ./src/services/event-generator ports: - "8081:8081" environment: - LOG_LEVEL=INFO - Document the interaction in
README.md.
Success Criteria
You’ve completed Day 1 if:
✅ Docker, Git, IntelliJ IDEA, Java, and Gradle are installed and working.
✅ The project repository has the correct structure.
✅ The logger service runs in a Docker container, logging every 5 seconds (configurable).
✅ File logging with rotation works, and logs are persisted in data/logs.
✅ The web interface displays logs and configuration at http://localhost:8080.
✅ The README.md is updated with instructions and configuration details.
Real-World Connection
This setup mirrors professional Java development at companies like:
- Netflix: Uses Spring Boot and Gradle for microservices.
- LinkedIn: Builds distributed systems with Java and Gradle.
- Uber: Leverages Spring Boot for scalable backends.
Tips for Using IntelliJ IDEA
- Spring Boot Dashboard: Use View > Tool Windows > Spring to manage and run Spring Boot applications.
- Gradle Integration: Refresh the Gradle project (Gradle > Reload All Gradle Projects) after updating
build.gradle. - Docker Integration: Connect to Docker in Services > Docker to manage containers.
- Code Navigation: Use Ctrl+Click to jump to definitions and Alt+Enter for quick fixes.
- Debugging: Set breakpoints and use Run > Debug to inspect the service.
Next Steps
- Push your code to a Git repository (e.g., GitHub).
- Take a screenshot of the logger output and web interface.
- Prepare to demonstrate your solution in the next session.
- In Day 2, add another service, implement communication (e.g., REST or Kafka), and add error handling.
If you need help with specific steps, converting the Maven project to Gradle, implementing the extension challenge, or generating a chart to visualize the architecture, let me know!
